Capture - Quick start guide
How to set up your Limit 8 MultiTool M2-Mk.II, M4 and M5 into hudl Sportscode
1
Plug the supplied USB-C power supply cable into either a mains power adapter or a MacBook USB-C port.
Connect the ethernet cable to your MacBook using a certified Ethernet to USB-C Adapter.
2
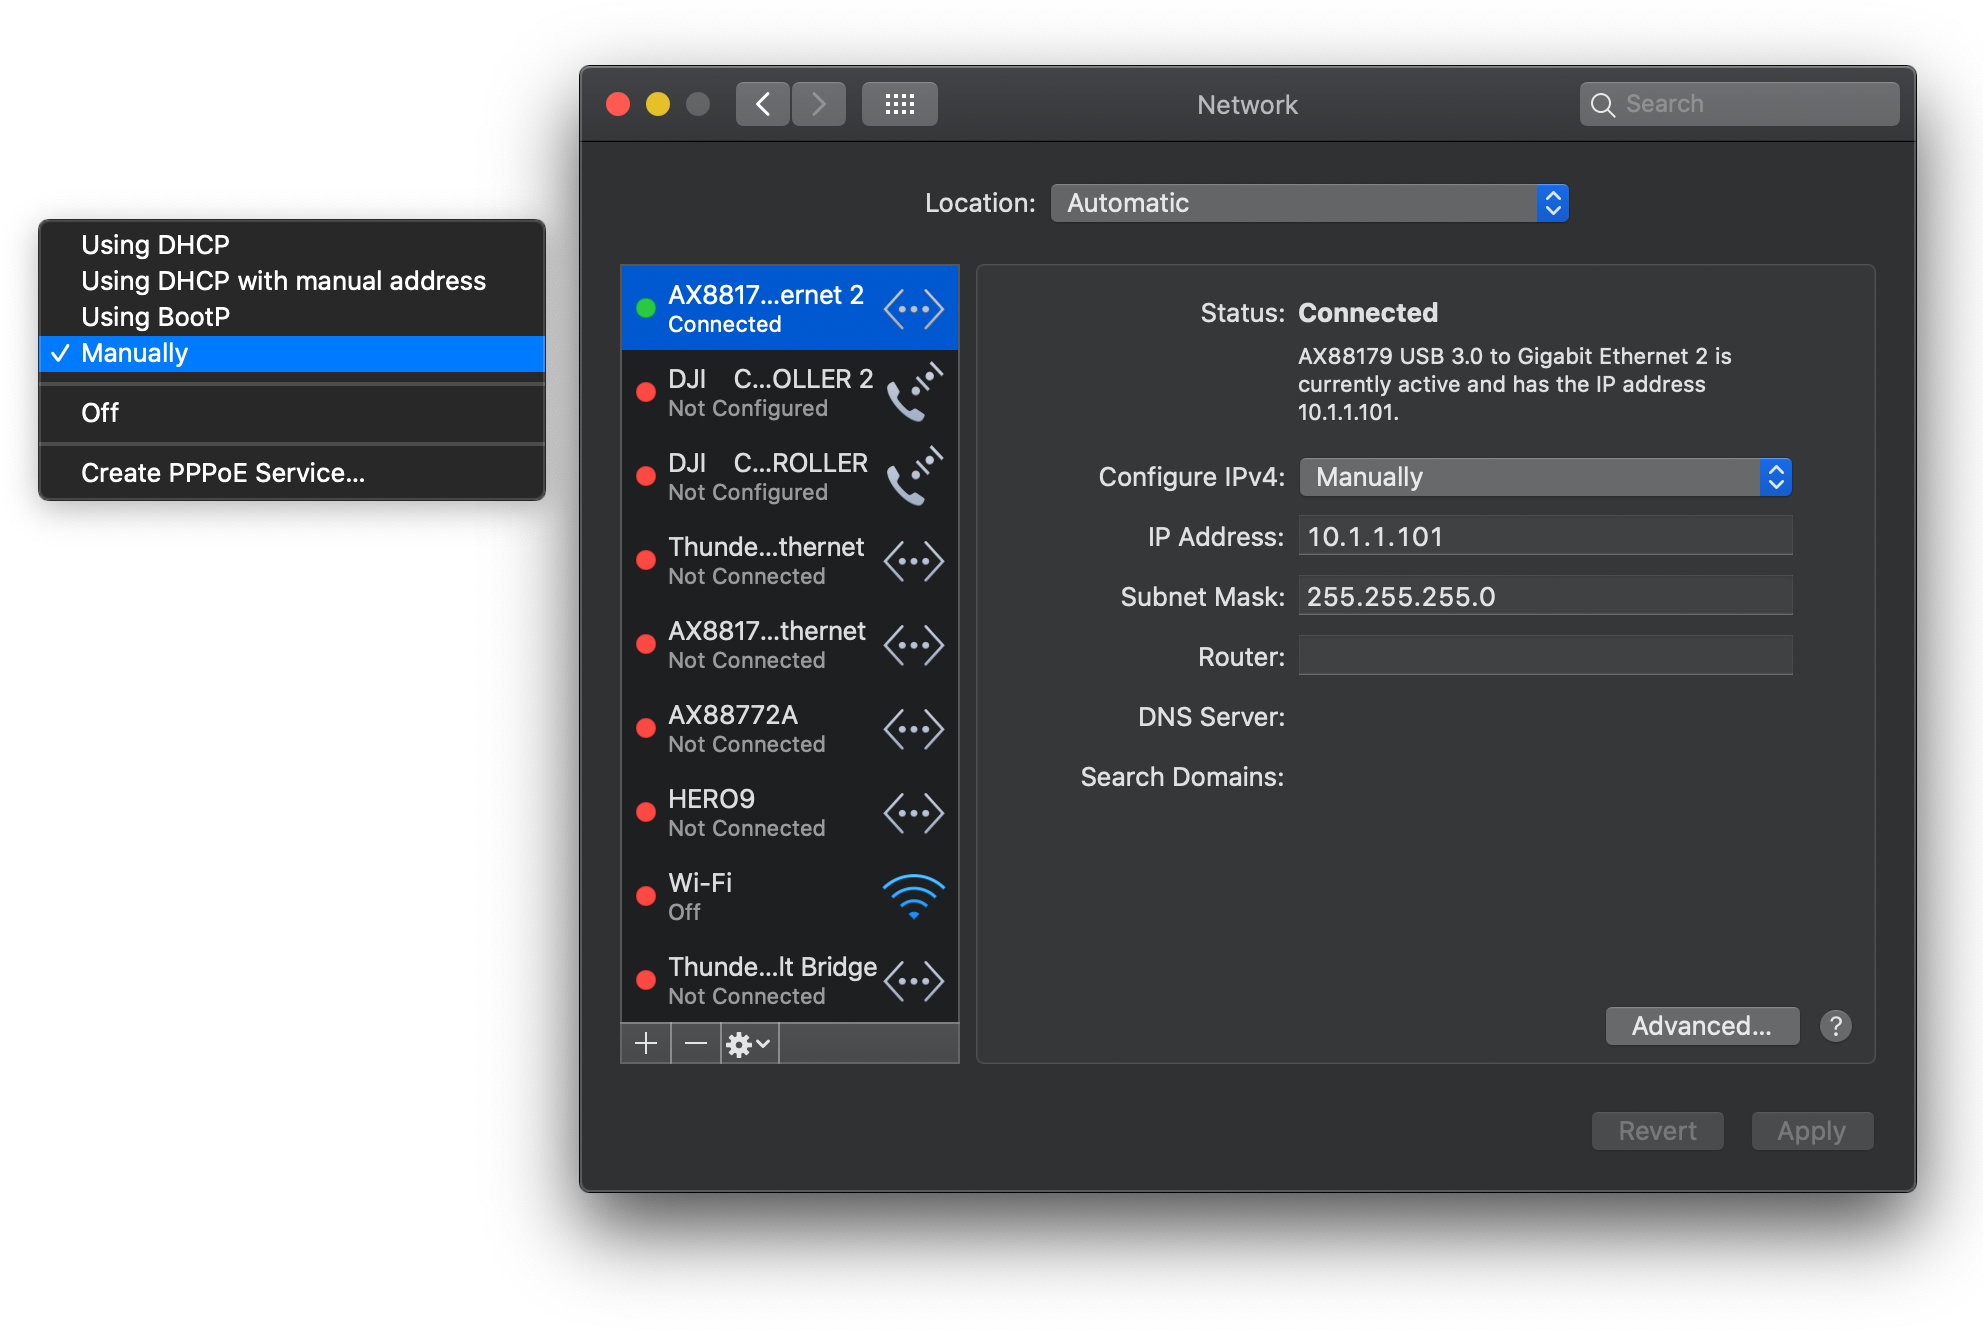
On your Capture Macbook, choose Apple menu > System Preferences, then click Network > Select the wired ethernet interface. If you don’t see the USB network adapter, you may need to add “+” it.
Configure IPv4 to “Manually” for its connected USB-C network adapter.
The default encoder IP address is 10.1.1.131, so choose an address within range, such as 10.1.1.101. Subnet as 255.255.255.0, router is not needed.
DHCP automatic operation is also possible when the encoder resides on a network with a DHCP server present and the encoder is set to DHCP. The encoder’s DHCP-allocated address will be shown on the front OLED display - see below for details.
NOTE:
M2 and M4 MultiTool encoders ordered with a 5-port. or 10-port switch option come with an enabled DHCP server for convenience. Please use DHCP automatic address setting within your connected device(s) network settings. The address range may not be 10.1.1.x.
3
Add your SDI and HDMI source(s).
We recommend using SDI and HDMI formats such as 720p25/29.97/30, 1080p25/29.97/30 and 1080i50/59.94/60.
Also, match source resolutions and frame rates for your nominal encode standard/region. For example, if the camera is set to 1080i50, then set the encoder frame rate (FPS) to 25fps. If the camera is 1080i59.94, then set the encode to 30fps. See below for encoder configuration instructions.
4
The encoder is pre-configured to send out both an RTMP and RTSP stream.
As factory default, here are the RTMP/RTSP addresses.
M2 Mk.II (SDI and HDMI 2ch):
SDI: rtmp://10.1.1.131:1935/live/sdi or rtsp://10.1.1.131:554/sdi
HDMI: rtmp://10.1.1.131:1935/live/hdmi or rtsp://10.1.1.131:554/hdmi
Test loop: rtmp://10.1.1.131:1935/live/test
M4 (SDI 4ch):
SDI: rtmp://10.1.1.131:1935/live/sdi1 to 4, or rtsp://10.1.1.131:554/sdi1 to 4
Test loop: rtmp://10.1.1.131:1935/live/test
Enter the RTMP/RTSP stream into Sportscode:
Capture > gear icon > feeds tab > add new +, then add the above streams.
Suggest you set your capture preset in sports code to “from source”, so your capture laptop doesn’t do any re-encode hard work.
Further information and steps can be found here on the hudl site.
Additional Instructions
The M2 Mk.II and M4 feature a powerful configuration WebUI, which also features a Hudl Sportscode-specific page for easy setup.
These instructions are specific to the latest (as of 28/02/24) M2 Mk.II and M4 v1.0.2 firmware. If you do not have this latest firmware, please send us a quick message including the device serial number here for a download link and support.
Login
Open the WebUI using the encoder IP address displayed on the front OLED (factory IP is 10.1.1.131). With admin as the username and password.
Dashboard
An easy place to check encoder resources and the status of your connected SDI or HDMI sources.
Also where Hudl Capture quick setup page can be accessed in the left-hand menu.
Hudl Quick Capture Setup
The hudl Quick Setup page has a selection of encoder settings specific to Sportscode capture. Here Resolution, Bitrate, Framerate and Keyframe/GOP can be set for the specific application. Please take note of the recommended encode settings.
Audio source select is where you can easily associate the audio from one input across all encoded outputs. Such as referee mic. Default setting will associate the audio track already embedded with each source. Selecting line or mute, will associate silence with your encoded output.
Encoder Network Setup
Selecting Network Setup from the hudl quick capture setup page allows you to set the encoder IP address.
It’s important to follow standard networking principles to avoid incorrect addressing and conflicts.
When selecting DHCP, please ensure a DHCP server is present on your network, otherwise you will lose connection to the encoder. If there is no DHCP present and the encoder is set to DHCP, you will need to factory reset the encoder - Press and hold the DEF RESET pin button for 10-seconds. The encoder will then be accessible from the default IP of 10.1.1.131.
Encoder RTMP/RTSP addresses
Selecting Capture URLs from the hudl quick capture setup page allows you to set and view the RTMP/RTSP address.
You can change the suffix to represent the source, such as tx, tactical or wide. lowercase is best and avoid spaces.
This is the source configuration relating to step 4 above, where you can find the factory default addresses.
Test loop
Both M2 Mk.II and M4 come with an internally generated test loop source enabled for quick capture setup testing even when you do not have an SDI or HDMI source available.
rtmp://10.1.1.131:1935/live/test where 10.1.1.131 should be replaced if you are using another address.
It is recommended to turn this feature off when not needed, to conserve resources.
Select Encode(1) from the left-hand menu, then disable(2) and apply(3).


